The Upgrade Kit You Have Purchased Is Dedicated To The Zmorph SX and VX Single Extruder.
Link With Detailed Images On How To Mount The Nozzle, Heat Block & Heat Break Tube
Link On How To Change Voxelizer 2.1.0 Settings For Bigger Nozzle Size
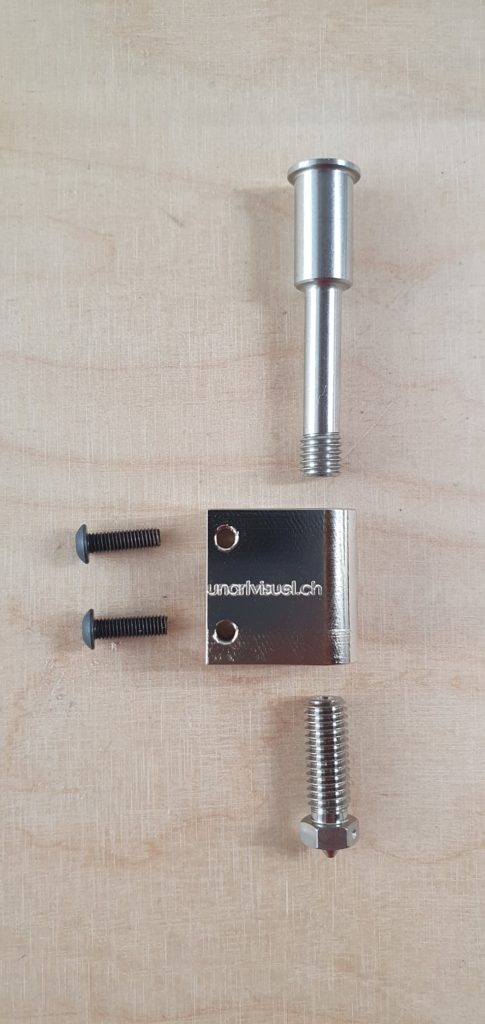
Two Parts Have Been Redesigned, The Heat Break Tube and The Heat Block. They Are Made To Fit In Place With No Other Part Adjustment. Heat Block Has Been Designed To Reduce It’s Weight As Much As Possible.
Kapton Tape Keeping Together The Box With The Parts Delivered Will Be Reused !
It Will Give You The Opportunity To Buy Different M6 Type Of Volcano Nozzles, Different Plated Hardness and Material From Various Shops.
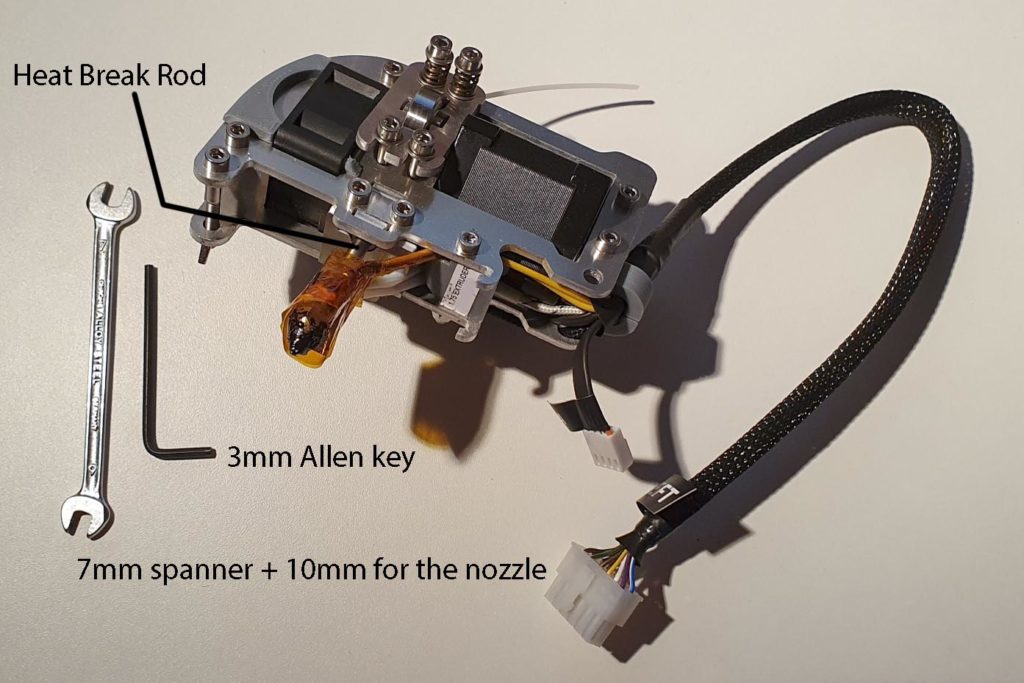
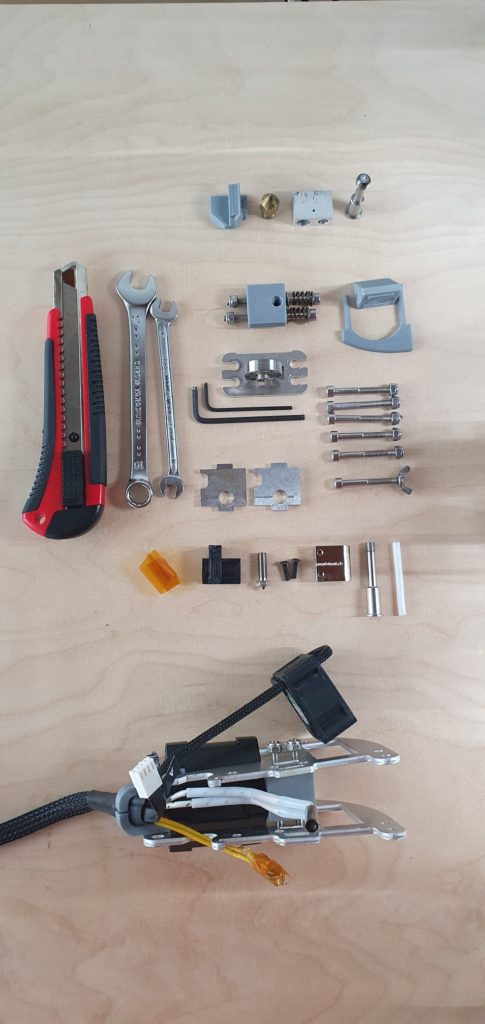
To Perform The Upgrade, You Will Need To Take Apart Most Of The Single Extruder, With The Provided Tools From Zmorph.
It Should Take Approx. 40 Minutes.
Take A Few Pictures Of Your Single Extruder, Especially, How The Nuts Are Tightened To Have An Example When You Remount Them.
First Step, Keep Your Single Extruder On The Printer and Print This STL file ! 0.3mm Nozzle In PLA Should Be Fine.
2) Once The Plastic Spacer Is Printed, Start To Remove The Following Parts. Caution, The Parts You Will Touch Will Be Very Hot!
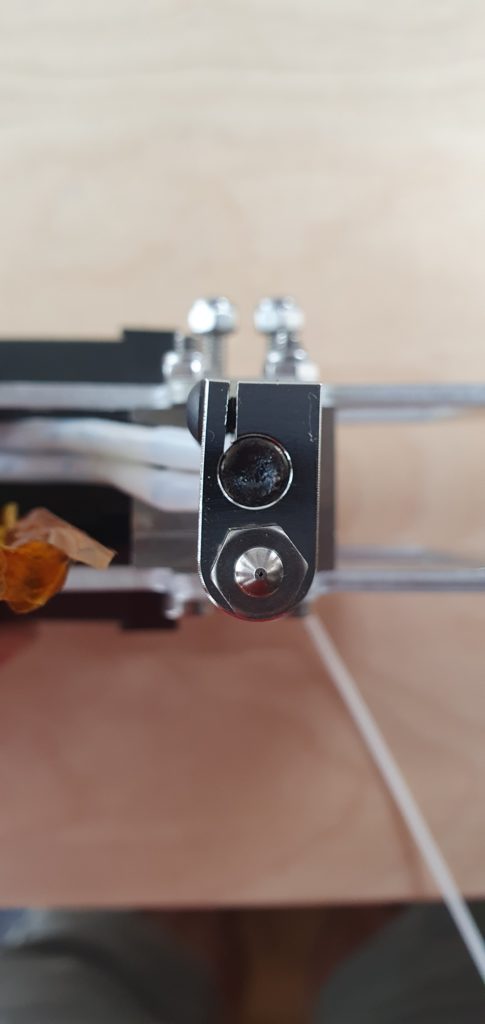
3) Unscrew The Nozzle While It Is Hot, Use Both Tools, One To Hold The Heating Block, The Other To Unscrew The Nozzle, Heat Break Tube Is Thin And Fragile.
4) Move The Heating Block By Rotating It Slightly Clockwise And Anti-Clockwise, angle of 2-5° , It Will Help You To Unscrew It In The Next Step
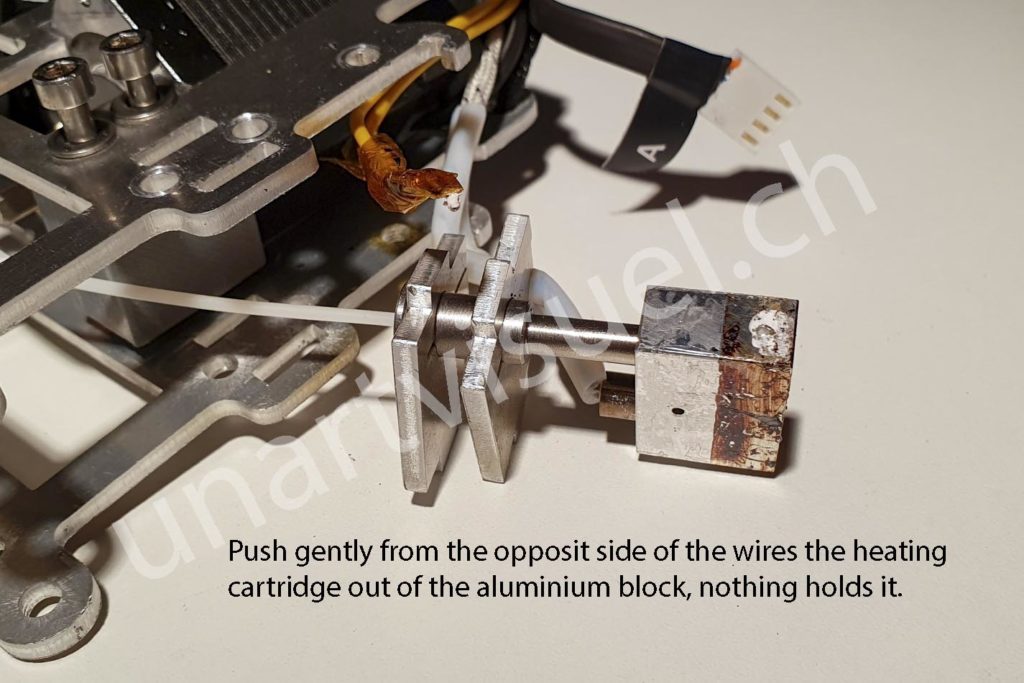
5) Try To Move The Heating Cartridge Slightly By Pushing On It Gently (With a 5-5.5mm Rod) From The Nozzle Side, The Cartridge Is Only Inserted, There Is Nothing To Tight It, It Did Probably Move Due To Previous Step, Rotating The Heat Block
6) Dismount The Single Extruder From The Printer. Caution, Parts Might Still Be Very Hot. Less Than 60°C It Should Not Burn.
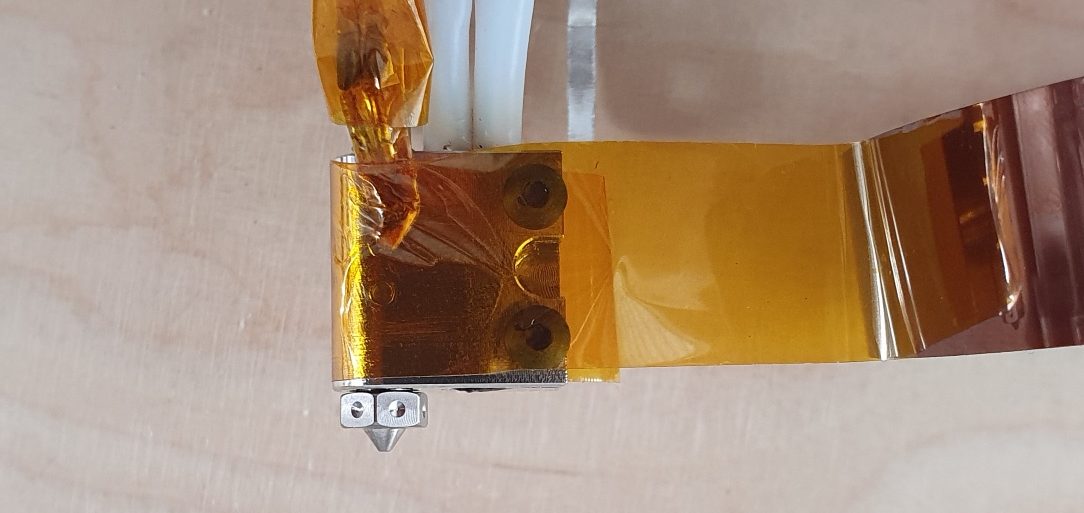
7) Remove The Yellow Heat Resistant Tape, Kapton Tape. Be Careful, This Tape Is Holding In Place The Thermistor, It’s End Bit Is made Of Glass, It’s Wires Are Very Thin And Fragile. Remove It With Surgical Players, Leave The End Bit Bended As Is.
8) Remove The Screws As Shown In Red, Others, Just Loosen Them. (5Th Blue, On SX, You Need To Remove Them Too…)
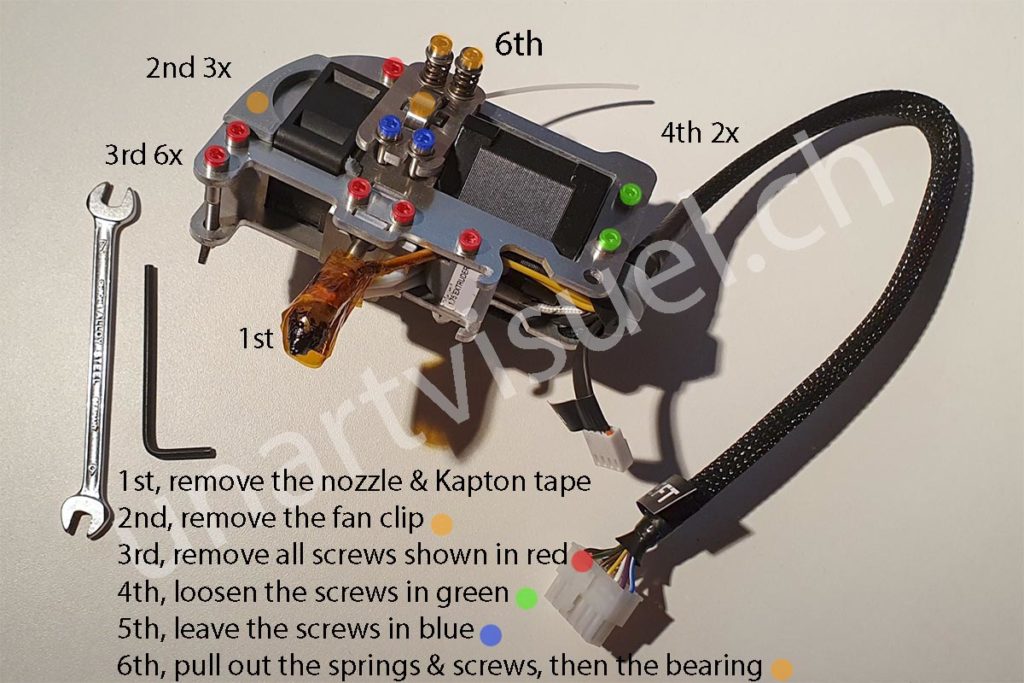
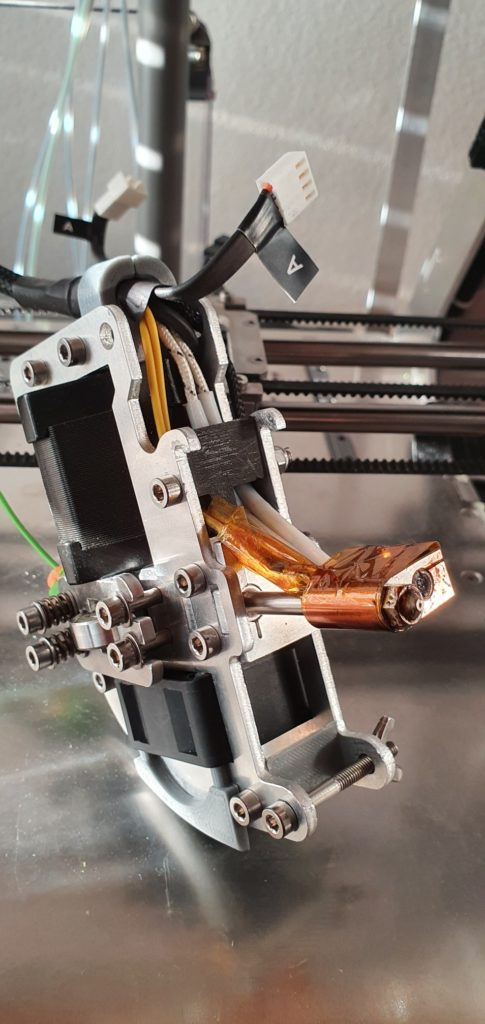
9) Follow The Image Instructions. When Pulling Out The Hot End, The Heat Cartridge Is Still In Place, Be Careful Not To Pull It And Worn The Wires.
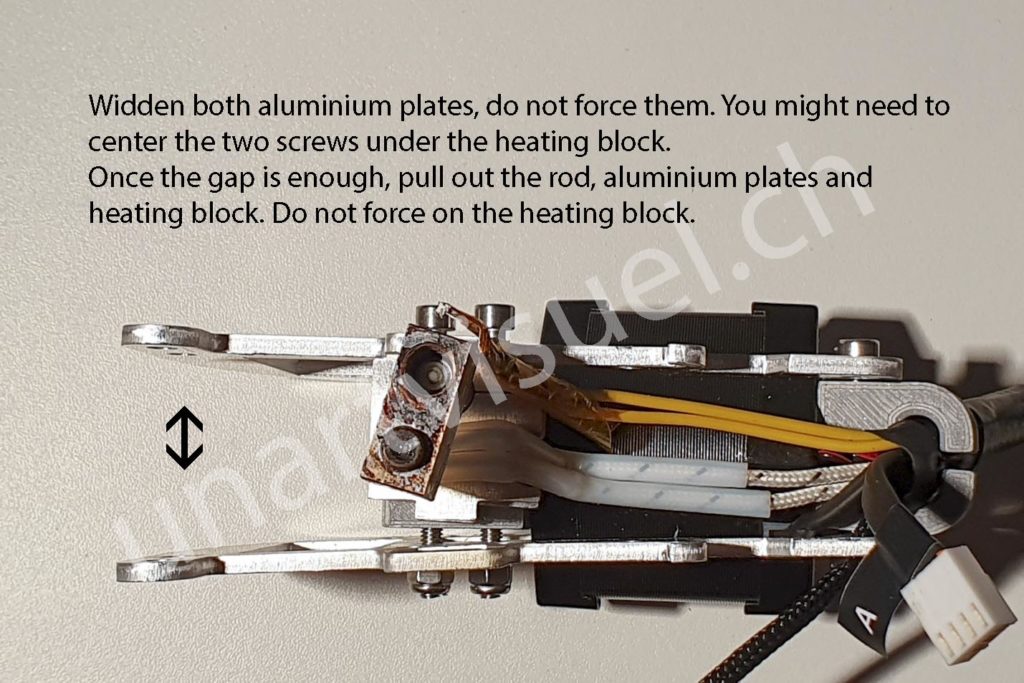
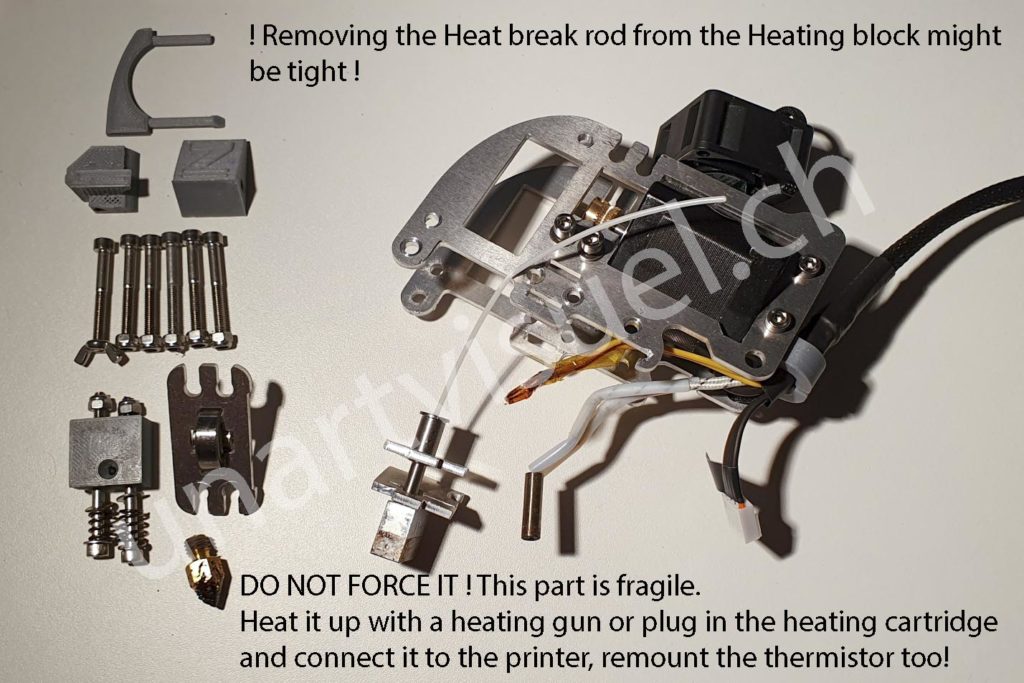
10) If The Heating Cartridge Is Still Tight, Or The Heat Break Tube Is Tight, Use A Heating Gun Or Plug Back The Single Extruder And Heat It Up To More Or Less 80°C
11) Gently Pull Apart The Cartridge And The Heat Break Tube. Never Force It! You Will Need The Aluminium Plates For The New Parts.
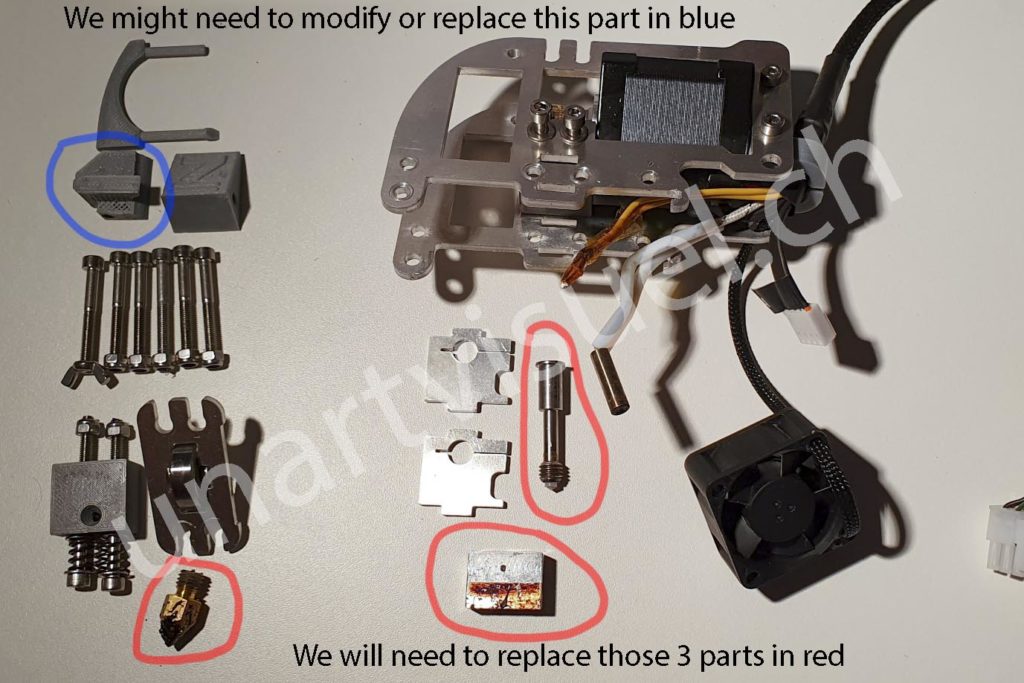
12) The Plastic Spacer In Blue Is The Stl File You Need To Print, Download Here
13) The Parts In Red Will Be Replaced, Included The PTFE Tube Into The Heat Break Tube. Those Parts Are Included In The Starter Upgrade Kit And Full Upgrade Kit.
14) Zmorph Single Extruder In Autopsy Mode… Ready To Mount It All Again? Try To Grab A Few, 2-3 Millimetres Of The Wires For The Heat Cartridge And For The Thermistance By Pulling From The Bunch Of Wires. It Will Be tight, But It Does Work Out. Watch out, pull on the thick wires, not the thin ones of the thermistor, you will break them, they are really fragile!!!
15) First, We Will Put Together The Hot End Parts. The Heat Break Tube With PTFE Tube Already Inserted, The Heat Block, The 0.4mm Nozzle. Screw The Nozzle All The Way Into The Heating Block, Then leave A Gap, Unscrew It 1/2 Turn. Screw In The Heat Break Tube All The Way Until It Reaches The Nozzle, approx 4mm In, Hand Tight It There. Be Aware, Heat Break Tube Is Very Thin! Always Unscrew The Nozzle From The Heat Block First By Holding On Both! Once All Mounted, We Will Heat Up The Hot End At 200°C And Tight It Again.
Never Hold The Heat Break Tube
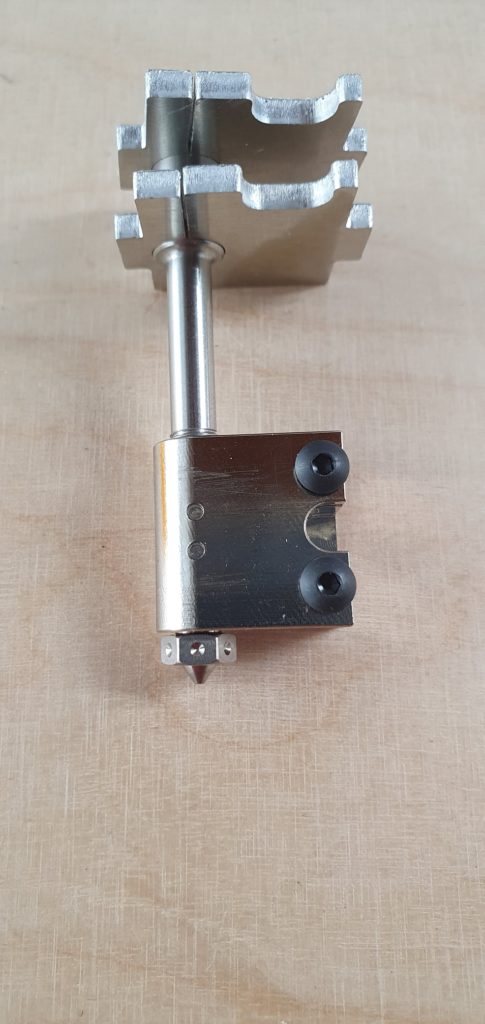
Watch The Mounting Plates Position ! There Should Be A Gap Between The Nozzle And The Heat Block.
IMPORTANT: HOW TO MOUNT THE HEAT BREAK TUBE AND THE NOZZLE INTO THE HEAT BLOCK, CHECK HERE!
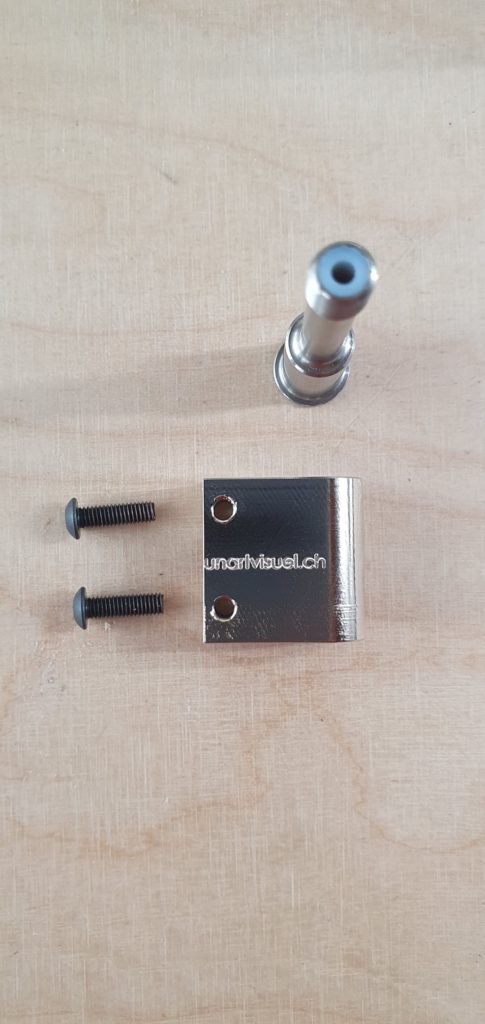
16) Push The Heat Cartridge Into The Heat Block. (You Can Add Some Thermal Compound) Insert The Aluminium Cooling Plates Into The Extruder Chassis. When You Tighten The 2 Screws, Make Sure The Heat Block Is Perpendicular To The Chassis But Also Facing The Hole Of The Plastic Guide. Insert Some Filament From The Motor Side All The Way Down To The Nozzle, It Must Go In Freely, All The Way Down. Leave The Filament Inside While Adjusting And Tightening The Heat Block To The Extruder. Double Check It.
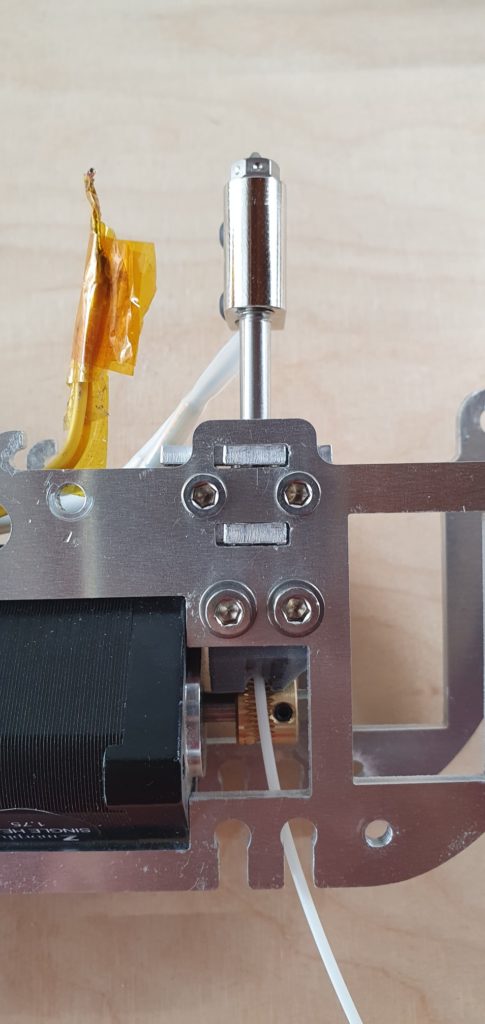
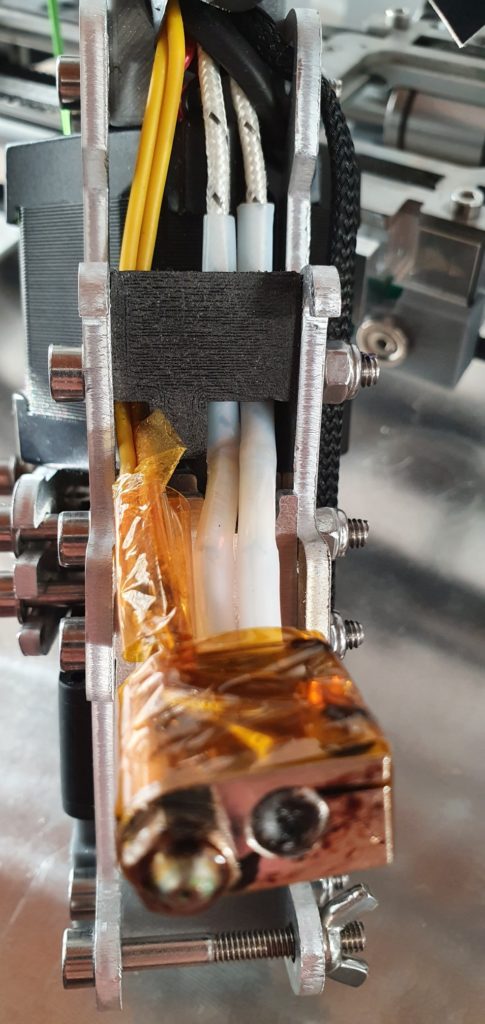
17) Tighten The Two Screws Holding The Heating Cartridge. Insert The Thermistance Into The Heat Block, Lowest Hole Is OK. Be Careful, It Is Very Fragile. The Kapton Tape Used To Tighten The Box Shipped With The Parts Is Now Reused To Fix The Thermistance. Start Taping From The Sharp Edge On The Opposite Side Of This View Below.
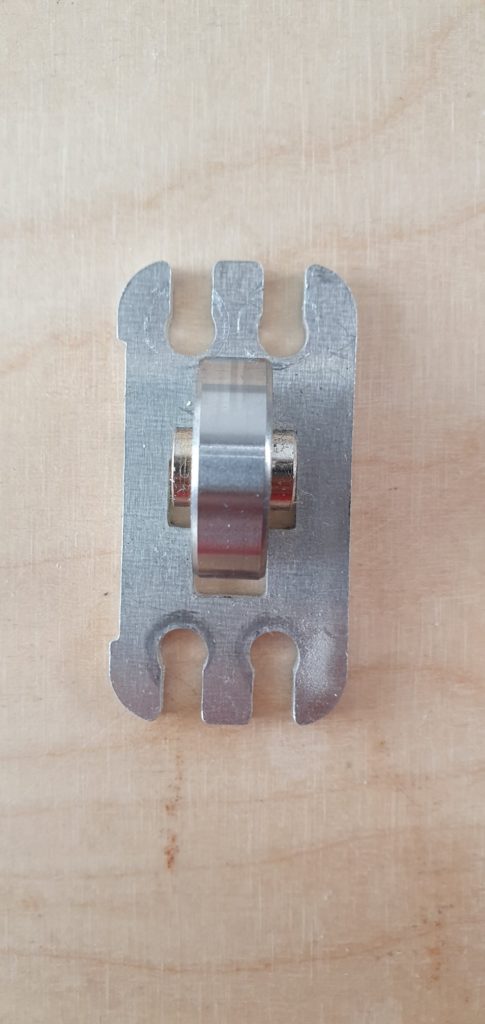
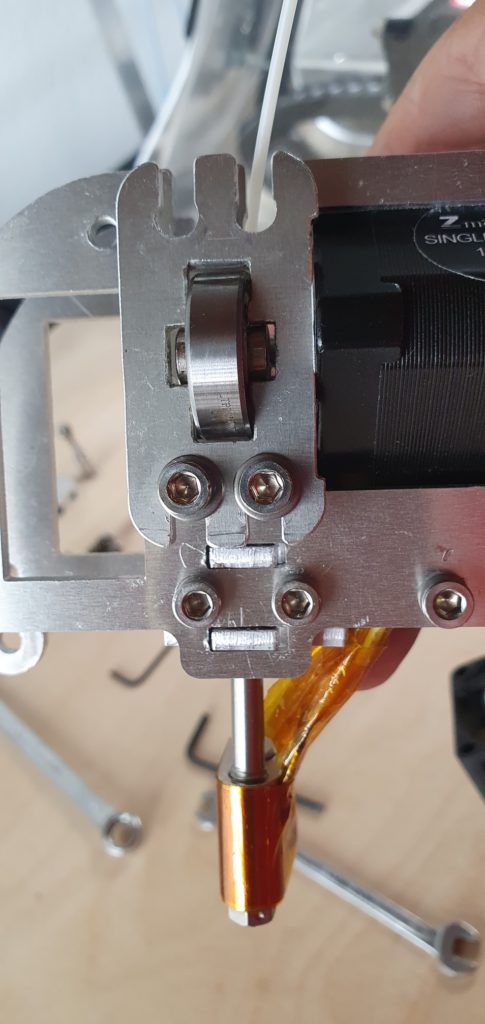
18)Mount The Bearing, The Plate Holding The Bearing Has A Specific Mounting Position, The Notch On The Side Goes Against The Step Motor. The Nuts Of Those Screws Should Not Have More Than One Thread Coming Out The Nut. It Is Not Necessary To Apply Too Much Pressure On The Filament There, As Clogs Should Not Happen, Step Motor Axis Does Not Like High Pressure On The Bearing, You Could Damage It. You Might Have To Clean The Gear With A Needle To Get A Great Grip Again.
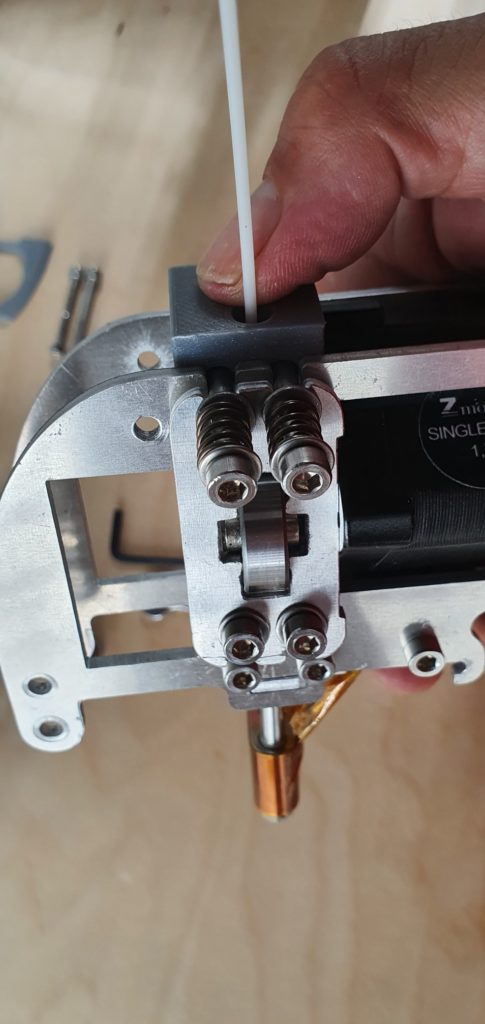
19) Now Mount The Plastic Guide, And Insert The Two Screws. It Is Slightly Different From The SX And The VX Single Extruder. The Hole For The Screw On Front Of This Plastic Part Will Tighten The Plastic Guide, Not The Ones With The Spring. The Filament Should Still Be Freely Moving All The Way Down To The Nozzle.
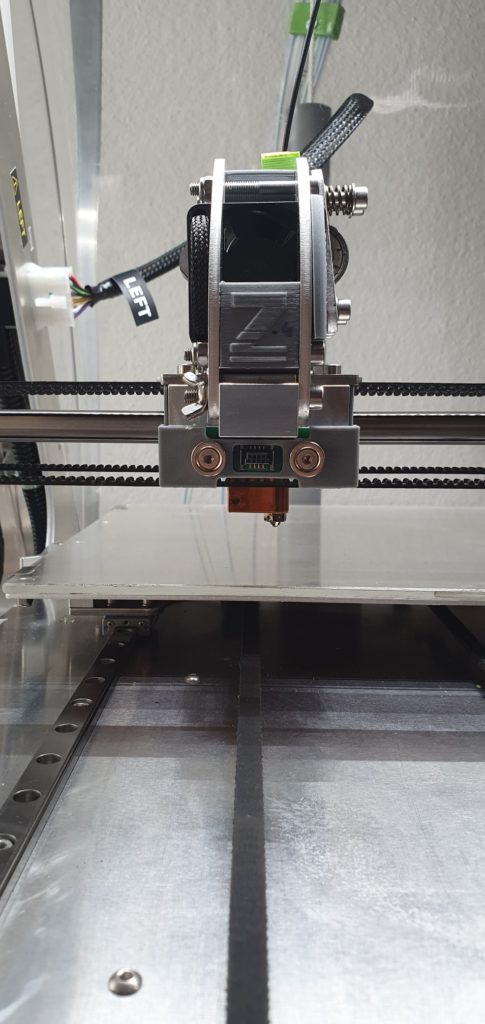
20) Put Back All The Screws, And The Plastic Spacer You Printed. No Need To Tighten Them Too Much, Clip The Fan… . You Should Now Be Ready To Mount The Single Extruder On The Zmorph. If It Does Not Mount Freely, Loosen Slightly The Red And Green Screws That Fixes The Single Extruder Chassis Together, Mount The Single Extruder On The Rail, And Gently Tighten The Screws When Mounted. Check That There Still Is A Gap Between The Nozzle And The Heat Block. (Otherwise, You Will Face A Filament Leakage Between The Heat Break Tube And The Nozzle!) Check Also That The Heat Block Is Perpendicular! Height Dimensions Are Exactly The Same.
It Is Also Possible To Test The Setup Without The Plastic Spacer And Mount It Directly. In This Case, The Step Motor Will Have Little Freedom, Insert A Small Part Between The Motor And The Aluminium Frame To Avoid From Rotating Slightly.
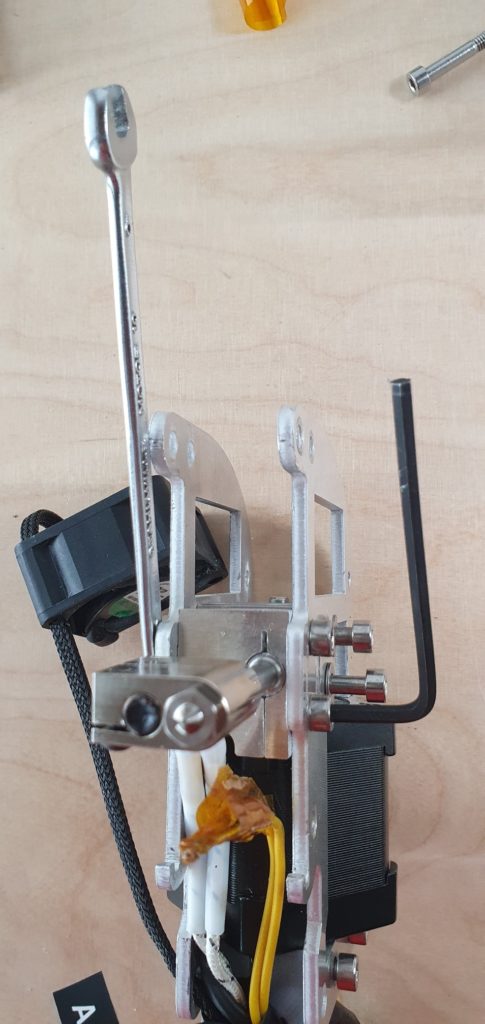
21) You Are Ready For Testing The New Hot End. Heat Up Manually The Hot End (200°C), You Might Want To Tighten A Little More The Nozzle Once At PLA Temperature. Hold Both With Spanners, Heat Block And Nozzle When Tightening The Hot End. Then Push Down By Hand The Filament, It Should Come Out Smoothly. Pull Back The Filament 20mm To Avoid Filament Leak While Calibrating. Now Calibrate Your Single Extruder. I Usually Do An Auto-calibration Skipping The Print, Then I Perform A Single Manual Calibration And Insert A Gauge 0.1mm High (80gr sheet of paper) Between The Nozzle And The Bed, Every Thing At Printing Temperature. Bring Down The Head Until It Touches The Gauge Or The Paper. You Should Be Able To Remove Them With Very Light Friction. (Parts Have Been Designed To Have The Exact Same Height As With Previous Heat Block!)
22) Start Your Test With The 0.4mm Nozzle, Take A Gcode Part That You Printed With The .4mm Nozzle, And Reprint It. Same Settings. Now, While Printing, Increase The Printing Speed, 150, 200, 300% And See How Fast You Can Go… And Reduce The Heating While Printing, Up To 5-15°C. Play Around With Those Settings Until You Reach Some Limits. There Should Be No More Clogging At A Much Higher Print Speed! You Have Reached Your Goal With This New Hot End! Enjoy It.
23) Play With Settings In Voxelizer Or Other Slicers, Increasing The Print Speed To 40mm/s Is Easily Acceptable, Most Materials, Even 50mm/s. Remember That Infill Was Set At 150% Of The Printing Speed, You Will Have To Lower It Down To 100% As You Are Already Pushing The Extrusion To It’s Limits. Then It Could Clog 🙂 Too High Speed Will Slightly Change The Precision Of Your Prints. Strange Noise While Head Is Moving Sideways Is Probably Due To Closed Loop Axis Compensation. Reduce Speed A Little. This Head Is Heavy, It Brings A Lot Of Inertia, That Can Affect Limitation In Speed Movements Compare To A very Light Extruder With No Step Motor On It.
Troubleshooting:
When Plugging Back The Single Extruder, You Should See The Temperature Of The Heat Block Showing On The Screen, If Not… Check The Thermistance (Link To Original Mouser Supplier), It Might Have Been Damaged, Or The Wires Are Not Enough Protected And Touching Together, Or Touching The Heat Block. Adding thermal compound (Not Conductive!!!) Could Be a Good Help For Heat Stability Measurements.
Higher Nozzle Size
The 0.8mm Volcano Nozzle, And All The Others Available Online Need Some Fine Tuning. First In Voxelizer, Follow The Link Below. Then, A Few Hints:
First Print: Once The Upgrade Kit Mounted, Do Your First Print With 0.4mm Nozzle, With A Part That You Know And Printed Before. During Printing Process, Increase The Print Speed, And See How Much Faster You Can Print, Thus, With No Clogs!
Print Speed: You Are Used To Print With 0.3, 0.4mm Nozzle. The Extruding Volume With A 0.8mm Nozzle Is 4X More Than 0.4mm Nozzle. You Will Have To Take This In Consideration When Presetting Your Filament Parameters, Going Down To 15-20mm/s. I Have Specific Filament Presets For 0.8mm Nozzle, To Avoid Confusion, Excessive Speeds Or Errors During Prints.
Heat: As Heat Transmission Is Much More Efficient With This Heat Block And Nozzle, You Can Follow The Filament Heating Parameters And Use In Most Of The Cases The Lowest Value For Your Prints. Or reduce from 5 to 15°C the previous value used, until it does not string. Increasing the speed of your print might make you bring up the temperature values higher again. Play with it while printing.
Retraction: I’ve seen that retraction amount and distance can be an interesting value to modify to reduce stringing. 2mm for retraction amount (instead of 4mm), 3mm for retraction distance (instead of 10mm) of course depending on the material you use. I tried the distance height, but did not see much difference there. Make your test.
Layers: As Layers Are Much More Consequent, I Tried Up To 0.9mm Layer High, With 1.4mm Wide, Your Print Will Build Up Quickly, But You Will Need To Speed Down Your Print Speed Parameter, I Went Down At ~15-20mm/S. There Is A Limit Of How Much The Heat Block Can Heat Up The Filament, It Needs A Minimum Of Time For Transformation. You Will Still Gain Huge Time.
Infill: Basic Voxelizer Settings Is 150% Of The Printing Speed, Reduce It Down To 100% Maximum, As You Are Already Hitting The Maximum Extrusion Capacity. Make Your Tests.
Gap: The Gap Between The Nozzle And The Bed Needs To Be A Little Higher for the 0.8mm nozzle, Try 0.15 – 0.2mm Or Change The Value In Voxelizer, Add 0.05-0.1mm From The Basic 0.0 Setting With The Paper Sheet Physical Preset.
1st Layer: The First Layer Can Be Increased To 0.45mm high, 0.55-0.60mm wide, 60% Speed, Even Higher Values, Test It
Extrusion Amount: First Layer Set Usually At 110%, You Might Have To Bring It Down To 106% Or Lower, Depending On Your Material. For The “Extrusion During Print” Parameter, You Might Need To Increase It To 1.03, Be Aware That The Size Of Your Part Will Increase Too. Adapt It In Consequence, Your Experience Will Make The Difference.
Wall Thickness: Your Parts Needs To Have A Minimum Wall Thickness To Play With Big Nozzle Size, At Least The Nozzle Diameter Size. With Smaller Nozzles, As You Can Go At A Much Higher Print Speed, You Will Gain Great Time There Too. The Boat Test Sample Is Made For Small Nozzles As There Is Many Details In It.
Speed: It Is Better To Set A Print Speed Lower Than Too High. Lower, You Can Increase The Print Speed During Process Up To 300%, All Other Parameters Will Also Increase. If There Is Some Clogs Due To Excessive Speed, Lowering It Down Will Not Be Immediate, It Will Also Reduce All Other Movement Parameters, And Slow Down Your Print Process, Also During Empty Moves From One Point To Another Where It Is A Greater Lost Of Time.
Nozzles: The Ones Delivered Are Commercial E3D Volcano You Can Find In Many Online Shops. For Best Results, The Ones Provided Are The Copper With Nickel Plating. Many Other Coating And Material Are Available, But As Copper Is The Best Heating Transfer Material, All Others Ones Might Be Less Performing, And Reducing Speed To Keep Up A Correct Filament Temperature Extrusion Will Probably Be A Good Option.
E3D V6 Nozzle Type, (12.5mm Long) Could Be Inserted Into The Heat Block, You Would Then Need To Compensate The Difference Of Length With A Stainless Steel Tube Outer Diameter 5mm, Inner Diameter 4-4.2Mm, 3.5Mm Length And Change The Actual Ptfe Tube With A Longer One Also 3.5Mm Longer. It’s tricky… and needs a little tinkering to remove parts.
Resume, Higher Size Nozzles Are Made For Bigger Parts With Thick Walls, Details Are Reduced. Do Not Expect Doing The Boat Test With A 0.8Mm Nozzle, It Is Not Made For High Detailed Part.
Time: Overall Printed Part With A O.8Mm Nozzle Can Be Reduced Up To 10X The Usual Print Time With A 0.4mm Nozzle, Due To Higher Speed, Higher Material Flow And Improved Heating, All This With No Clogs. Have Fun!
Voxelizer
You Will Now Need To Add Different Nozzles Sizes In Voxelizer, Follow This Link
Voxelizer 3.0 And Above As I Heard Does Not Give You The Possibility To Add Different Nozzle Than 0.4Mm. You Need To Download The Version Voxelizer Experimental 2.1.0 That Works Just Fine.
Enjoy It And Share Your Experience 🙂